Records multiple sequential images to individual PNG, GIF, BMP or TIFF files.
Many presentation programs allow you to construct simple animations by displaying a sequence of images. The Map3D image recorder allows you to record multiple screen dumps to a individual PNG, GIF, BMP or TIFF files.
The animated TIFF/GIF Recorder saves multiple images to the same TIFF or GIF file. These images can be played back with an image viewer that can display animated TIFFs or GIFs (such as Map3D Image Viewer, most internet browsers, Windows Photo Viewer etc.).
The Image Recorder creates multiple images to separate files.
Once you select File > Output > Image Recorder, you will be prompted to specify a file name to save the animation. Image file names will be generated by appending the image count onto the file name you specify (e.g. name0001.png, name0002.png, name0003.png ...).
The recorder dialogue box provides information on the current animation and allows you to control recording and specify animation options.
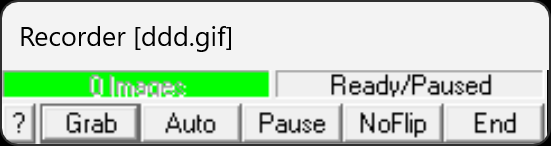
The current number of images in the animation is displayed along with the status of the recorder. Various status states include:
Ready/Paused – animation file is open and ready to record. Press Grab or Auto to add an image.
Capturing Image – image is being added to the animation.
Ready/Auto Capture - displayed images will be automatically added to the animation as you update the screen.
Recorder Off – animation file is closed and not ready to record.
Grab – adds the current displayed image to the animation.
Auto – automatically adds displayed images to the animation as you update the screen. This includes all rotation, translation and plotting operations you perform.
Pause – disables automatic mode.
Flipped/NoFlip – toggles background and foreground (normally black and white) will be reversed.
End – stops the recorder and closes the animation file.
Notes:
Additional images can be appended to an existing sequence of images be checking File > Output > Image Recorder > Append Images when selecting the file name for the animation sequence.
Rotation and translation operations can be repeated automatically by typing n# before selecting the operation. For example to produce an animated display of a stress plot, specify the following
Plot > Options > Persist
Plot > Stress > Sigma:1
View > Rotation Increment > 10
Select the Auto button
Type in 35#
Select rotate right (either from the rotation toolbar or the PageDown key).
A series of files numbered name001 to name036 will be created. These can be imported into presentation software for animation and display.
Stress contours that change as mining progresses can be displayed by grabbing a series of plots as the mining step is advanced.